Monday, 31 December 2012

2012: the year of celebrity babies

0 comments
The media have been careful in judging the past year as the 'year of celebrity babies'. Since I too, had a baby, it seemed that the whole world around me was having one, two or more too. But as it has been validated by the very resourceful papparazzi itself, looks like people were in a rush to pop out babies before the world ended.
This post however, is not about everyone who had a child in 2012, but few of those who I think are worth a mention; and of those whom I have been keeping a track out of pregnancy-bond-induced obligation

This is my personal top ten list of the celebrity newborns who owe their popularity to their awesome parents, as opposed to their assuming cuteness.

10

Parents: Uma Thurman and Arpad Busson
Newborn: Girl - Rosalind Arusha Arkadina Altalune Florence Thurman-Busson aka Luna

I just included the baby in the list for her (presumptious) attractive name.

 'don't worry baby. I will slash every kid, who makes fun of your name,  with my katana!'

9

Parents: Allyson Hannigan and Alexis Denisof
Newborn: Girl - Keeva Jane Denisof
What?! So that was not a fake baby Lily and Marshall were having on ‘How I Met your Mother’s season 7? So I guess I was the only one who didn't know. huh ..

8

Parents: Shilpa Shetty and Raj Kundra
Newborn: Boy – Viaan Raj Kundra
During pregnancy, when at times I just couldn't resist my cravings for fries, I often indulged myself anyway, by exemplifying Shilpa Shetty. If she’s got a personalized yoga tutorial then she definitely will need to get back in shape! I had hoped to do the same. Sadly things haven't worked out that way yet.

7

Parents: Meesha Shafi and Mahmood Rahman
Newborn:  Girl - (couldn't find name on the Internet and she didn't tell me personally)
Either she refuses to explode while pregnant, or her tailor makes really great custom fitted clothes; or maybe coke studio was just recorded way earlier than she was expecting.
*still shaking head trying to figure out*
I'm so sure this is the photo of her first baby, since Pakistani paparazzi are gracious enough not to intrude and let celebrities release photos on personal accord


6

Parents: Megan Fox and Brian Austin Green
Newborn: Boy – Noah
Personally for me the birth’s a little unsettling, cause I can never really get myself to picture her as a mom.


we so cannot be interested in a photo of the baby if the mama can manage to pull off platforms with that baby bump

5


Parents: Nadia Hussain and Atif Khan
Newborn: Girl - Sasha
Looks like she’s got everything; and another baby.
'mama, since it seems you can do anything, I want a unicorn right now!'

4

Parents: Chris Hemsworth and Elsa Pataky
Newborn: Girl - India Rose Hemsworth
Though the Avengers’ the Iron Man also had a baby, only Thor made it to my personalized list; only cause he is looking at his baby girl with so much of love in this picture

*awww*
*vader hissing*
'I am your All-father!'

3


Parents: Beyonce Knowles and Jay-Z
Newborn: Girl - Blue Ivy Carter
The little girl was my number one at the starting of the year; and then other cool people also had babies.


2

Parents: Adele and Simon Konecki
Newborn: Boy - name still a secret, but who cares! it's Adele's and that's more than enough!
Adele’s finally shown him (the guy who broke her heart and made her into the musical-weapon-of-mass-destruction) and the world that
‘hell hath no fury like a woman scorned’

Has he yet heard that she's settled down, that she found a boy ... but she's not married yet. Looks like the lyrics can't fit well here then.


1

Parents: Umar Gul and ‘name unknown’; as the great Gul quotes: ‘Don't ask about her name. It is not considered good in Pashtun'.
Newborn: Girl - Rehab Umar (atleast we know her name)
Yes! Our very own Gul boy had his little girl! And the local production is such an  adorable bubble of cuteness that she definitely had to be my numero uno!

Sunday, 30 December 2012

Monday Moves: the 'commercial' sets

0 comments
Once in a while I like to treat myself to saucy soaps on television. As the episode progresses, I can't help but ogle at the figure-perfect ladies strutting about in sleeveless dresses and showing off their toned arms. 
In the midst of determination and pent-up frustration to look as stunning as these women, I went all gymnast to adopt the most strenuous of routines, only to be left worn out at the end!

this .. is .. tough!


I then came up with a 'during-commercials-exercise-sets-for-toning-arms', to not only enjoy my soaps but also target the muscles I wanted to.
Each exercise takes no more than five minutes; long enough to last a commercial break and not force you to give up on the extra exercise


360-degrees arms


This exercise targets your biceps, triceps and shoulders.
  • Extend your arms perpendicular to your body. Flex your shoulders and pull up your neck and breath through your chest. Push your feet flat on the ground.
  • Move your arms forward, stretching them as further as you can. You will feel a strain in your shoulder plates during the rotations. 
  • Count up to 20 circles.Then reverse the direction count up to 20 rotations again.

Bicep Curls (without weights)


You can choose to do this exercise either sitting down or standing up. Traditionally the exercise uses weights but since you're only killing time till the show resumes, we've tailored it accordingly.
  • Pull your elbows close to the body, with your arms resting on the sides. 
  • Open the palm of your right hand to face forward, and with your left, encircle the wrist of the right arm.
  • Clench your right hand into a fist and pull it up towards your bicep, with the left arm resisting the motion. Provide the resistance in the opposite direction as you push down the hand to its original position.
  • Count up to 10 repititons, then change arms. 

Behind Back Arms Clasp


The exercise focuses upon the muscles in the shoulder and triceps. You can easily do this while sitting down or standing up.
  • Keep your back straight to extend your right arm straight over your head in the air, while keeping the left along your body.
  • Fold your left arm behind your back by bending your elbow, while keeping the right in the same position.
  • Lower your right arm behind your back to stretch your fingers. Move the left arm to upwards to clasp the right hand. Please note that only the lower arm will move to force clasping. Beginners will struggle  to clasp the hands as the body will resist. 
  • Count up to ten once the hands clasp.
  • Repeat with the other arm, doing 5 repetitions on either side. 


If you want to extend the exercise, you can also opt for these tougher positions.


Traditional (Killer) Push-Ups


Push-ups focus on not only developing upper arm strength, but also strengthens the core.
  • Place your hands on the floor, shoulder-width apart. Rest your knees on the floor, and focus upon putting pressure on your thighs throughout the exercise. Align your hips and back.
  • Maintaining the alignment, bend your elbows to lower your body to within an inch from the floor. Pull yourself up.
  • Count up to 10 repetitions

Planks


If you see someone performing planks, it may seem quite easy compared to other routines. But boy oh boy! It took the breath out of me and proved to be most fruitful.
  • Align your body like in a push-up, but with your legs extended back, and feet together with toes resting on the floor. 
  • Place your forearms on the ground. Your can either place your palms on the ground or clasp your hands, but position your wrists under your shoulders. 
  • Pull in your abdominal muscles to keep your back straight. 
  • Support your body by putting pressure on your arms, as you count to 30. 
  • As you develop upper body strength, count up to 60, to build to a minute.


Now that is time well spent I'd say matey!

Monday, 24 December 2012

There's no place like 'your child's' home

0 comments
Indeed.

One of the most exciting parts of birth is the preparation for it. A child's nursery is her first abode, once she's born. Setting up your baby's nursery is a form of indulgence that every parent loves to dive in.
However, today, when schedules are hectic and there's an information overload, the question then posed is 

'how to go about setting up my child's room?'.

There's No Place Like Home are home decor experts, who say that

'when setting your child's room, there are many aspects that need to be considered in the attempts to not only make the room comfortable, but also cognitively stimulating. Such steps facilitate in the mental and physical growth of the child'.

Here is a guide, provided by the expert at There's No Place Like Home, in creating a truly nurturing room for your child.


Location


Begin by selecting a room in your house that is situated near the parents' room. It should be easily accessible to allow frequent visits. Choose a thin walled room or a room that echoes, so that when the baby cries she could be attended to readily.


Always decide upon a room that's within your reach to monitor the child

Choosing colours


Decide upon a colour theme for the room. The walls could either be painted or covered with wallpaper. While 'blue for boy' and 'pink for girl' may be clichéd,  you can choose to play around with different colours and opt for gender neutral colours like orange, yellow or red. These colours are vibrant and are one of the first colours an infant recognizes as her eyesight develops. 
Decal wall art or stencilled art are an innovative choice to add a personal touch to a child's room. You can either choose plain stripes in contrasting colours, or use animal figures for a theme; and a great thing about decals are that they can be easily removed to be changed to match the interests of your child as they grow up.

Decal art never goes out of style

Layout


Before buying furniture, begin by drawing a rough blueprint of the room to decide upon the placement. A good idea would be to take actual measurements and gauge whether the room has ample space for the child to move around or not. 
While planning the layout, do take into account storage. While closets and cupboards are the ideal storage places, shelves can also make for a good storage area. Shelves can be both functional and add to decorating the nursery. You can align toys in a section and towels and blankets in the other to add a symmetry to the outlook.

Shelves can be both functional ...


... and decorative

Furniture


A good way to start looking for furniture is to decide upon a theme for the room. Either minimalist, eclectic, trendy or modern, a theme will give you a direction to choose from a wide array of ranges.
Since your child will demand mobility, arrange the items in a manner to prevent any hazards. Also limit the furniture to essentials to allow addition of more furniture items as the child grows up. 

Choose comfort furniture


All this effort combined with the affection you put into setting up a nursery for your upcoming child, or remodelling your grown up's room, it'll always be a special place for them, once they realize that the true ingredient was their parents' love.

You can also visit There's No Place Like Home's special album dedicated to decorating children's rooms and feast upon the visual treat. 

Happy decorating and happy holidays!

Sunday, 23 December 2012

Monday Moves: mama's tummy time

0 comments
Megan Fox had her baby this year. Three months later she is back to her business of showing off her oh-so-gorgeous self.


'look at me, I'm so gorgeous'

And then there's me. Staring at my screen and wondering 'why is this not me?'
I know why; cause I haven't been working hard enough. 
So today I have made a pre-new year resolution to look as stunning as the lady above (and buy that outfit too, to prove so).

Here's an easy exercise I've started in my routine which perfectly fits in during my baby's tummy time. I call it 'mama's tummy time'
Officially termed the 'mountain climbers', the oblique motion 

  • builds cardio endurance
  • develops core strength (targets glutes)
  • tones triceps, thighs and abs


Preparing for Action!


Place hands on floor, shoulder width apart, and assume the plank position (similar to a push-up, only that arms should be extended perpendicular to the shoulders). Wrists, elbows and shoulders should be aligned.

Extend back your legs straight, resting your lower body on your forefeet.

Support your core by pulling your belly button in towards your spine. Maintain the contraction throughout the course of the exercise.

Bring your right leg inwards towards your chest, resting the foot on the floor (as shown in the picture below).


Alternate leg positions by jumping up and switching legs in the air, pulling leg towards your chest and resting your foot on the floor.

Continue alternating the feet, progressively increasing the speed.

Continue the routine for 30 - 60 seconds, working up to 2 minutes progressively.

For a detailed demo of the exercise, here's a video of a lady who takes her workout very seriously (you go girl!)


Beginners


If you are a beginner and complaining of back and/or shoulder pains, you can support your upper body against an elevated plain instead of lying on the floor.


Instead of making a complete foot-to-foot alternation, start by pulling one leg inwards and tapping your foot and then pushing back the foot to its initial position (where both the legs are straight). Do the same with the other leg, with double tapping of the same foot.


It doesn't matter if your baby's amused by what her mommy's doing jumping her hips in the air. Keep reminding yourself of the skin-tight green dress that's just waiting for you in Megan Fox's closet 

*sigh*


Wednesday, 19 December 2012

DIY Day: the 'flab-to-fab' top

0 comments
Pregnancy demands comfort. 
During my third trimester, I felt the most comfortable in the most popular item of clothing: the t-shirt. Oversized and adaptable to a growing tummy, the baggy shirts that proved to my friend then, post-birth, became my enemies. When I look at them now I just see a clutter stealing space in my closet.
Thanks to 'By WIlma', here's what I did to transform the floppy shirts to cute tops!


Step 1: sealing the boundaries

Place the shirt on a flat surface. Using a crayon, mark the shirt with alterations as illustrated in the image below.


Widen the neckline as desired, from the front and the back. Please note that the plunge in the front will be deeper than the back, as shown by the red trace in the above illustration.

Next, make four small cuts, as shown above, for the ribbon to slide through. The width of the cuts should match the width of the ribbon for a perfect fit. 
The first two cuts in the middle will be right below the bosom and a subsequent cut is to be made 4 inches from the first cut, closer to the sides of the t-shirt. 


Step 2: crafting the ribbon

Cut a ribbon in four pieces, each piece having a length of 14 inches. 
Insert the ribbons in each cut, in the direction shown by the arrows below.


Glue the ends of the ribbons (inserted inside the shirt) to the shirt. Now you will have four ribbons, two protruding from either side.
Wait for the glue to dry. To make a stronger bond with the shirt, you can also sew the ribbon under the shirt, either using the same colour thread (as of the shirt) or a colour of contrast for more vibrance!

Step 3: look pretty!

Wear the t-shirt and fasten the ribbons; first the ribbons on the inside and then those further towards the sides of the shirt. 


Voila! De toute beaute!


Thursday, 13 December 2012

The Phlegm Menace

0 comments


it's that time of the year that everybody loves! Cosy snuggles, hot chocolate, dry fruits' binging and opportunity to indulge in endless sleep. Sounds picture perfect doesn't it?!


Pinned Image

I too used to love winters. Till last year though. This year has been a different story. 
Karachi city's hardly witnessed any cold, and my baby fell right into the anticipated trap. He got a cold. 
Thankfully the severity of the cold was low, but it left him with a stuffy nose and congested chest. There should be a law against such diseases that make such tiny humans suffer like this. My baby seemed so helpless and stubborn at the same time that I wished I had a spell to make it go away


mama-me: 'anapneo fidelitas'


little baby: 'i'm still choking' * cough*


There were moments during the ordeal when I just glanced at my kid with a dead look. I had no clue what to do and pretended that I was trying to come up with a solution (a tactic I doubt my baby bought, or else he would've come over and hugged me).


... i kept staring till the baby got small .. very small

I then set forth to use the most useful resource in today's time: the world wide web. Within ten minutes, google presented a solution to my trauma in the form of a nasal aspirator
Nasal aspirators are devices used to suction excess mucus from the baby's nose in times of congestion and/or cold. Here's a video demonstrating its use.

Seemed the baby in the clip didn't like it much; neither did mine.
He hates it.

Every time I brought the aspirator near him, he started shreiking like a broken whistle. His response became so conditioned that now whenever I bring anything near his face, he goes all karate on me!


Using a nasal aspirator is not a one man job! 
While I did the nasty part of sticking the tube up the baby's nose, the baby's daddy provided distractions with his (illegible) gurgling. Now daddy is the baby's hero while mummy has been become his Woodhouse (Archer reference) 


Though my baby's passages are all cleared now, I still feel like I tortured my baby. 
Oh well, as long as they count tough love as good parenting.

Wednesday, 12 December 2012

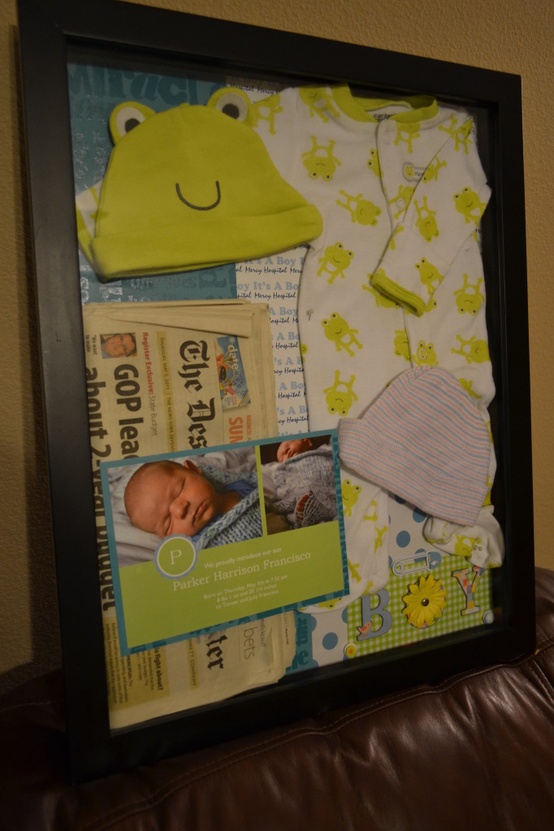
DIY Day: Newborn Keepsakes Shadow Box

3 comments
In the beginning it seems it'll never end!
With the constant crying on both ends (the mother and the baby), the strict scheduling of feeding every two hours, inability to adjust to what's happened to your body, enforced insomnia and of course counting to multiple centuries of diaper changes, time seems it's stood still.
However, once you're past the trauma, one day you sit down and wonder 'did I take a shower today?' :P 
Not really actually. You reminisce the initial months; and just for moments like these, you want to preserve your baby's tiny souvenirs from the early days. 
That is exactly what a newborn keepsakes box is for. Not only does it make for a timeless piece but a great decoration for your nursery.

Here's an easy guide on how you could make one:

Step 1: the shadow-box itself


Unless you already know a stationery shop that sells show boxes in Karachi, it'll be a little tough to find one here. Therefore, I sought out an online tutorial that uses regular frames to make a shadow box.

from this ...


... to this!


You can easily buy a variety of frames of your choice from either Gul Plaza in Saddar, or Nursery on Shahra-e-Faisal, or buy some from  here on OLX.  
You can also choose to make one from cardboard following the tutorial from this blog.

like a tiny doll house

Before you begin, however, decide upon the measurements you'd want for your shadow box display so that it can hold the items you may have assembled earlier.

Step 2: background theme


Select a theme for your display. You can line the box with fabric/wrapping paper/scrap book paper of your choice.


choose vibrant colours


you can use a variety of different papers to create a personalized theme


A wise choice would be to select a timeless paper so your shadow box display doesn't get outdated. Make sure the background doesn't clash with your items.


you can also create a background yourself using different shapes and/or pictures

You can also layer the box lining with styrofoam and felt over it, to allow items or accessories to be pinned onto the board.  

Step 3: the most exciting part!

Select the different items you want to display in the keepsakes exhibit. Usually parents cherish the hospital notifications/identity tags (read hospital souvenirs)  to feel nostalgic all over again once their child grows up to become a rebellious teenager.
You can choose to display the clothes from the day the baby came home for the first time; first hat; first pair of shoes; first diaper brand (unused of course); hospital tags; photos of the newborn or the pregnant mother, or better, both; baby announcement; or any other thing you may want to add!


Here are some pictures I discovered on pinterest of the final masterpieces!


do give this a try and let us know how it turned out! 

Monday, 10 December 2012

Flawless ‘Gol’ head: the science

0 comments
While the last post dealt with myths, what the aunties (who advised me and referred to in the last post) were actually trying to do was, warn me against the baby getting ‘flat spots’ on his head, owing to the baby resting his head in a similar position for a prolonged period. This phenomenon is formally known as ‘plagiocephaly’ or the ‘flat head syndrome’.
A baby’s head is vulnerable to being misshapen as the skull is soft and disjoint (to help the passage of the head through the birth canal), and prone to adopt any shape where applied pressure.
A baby’s head may adopt a shape within the uterus if there are multiple pregnancies, and lead to an oddly looking head at birth. This usually corrects itself within six weeks. However, if flat spots develop later, this is termed as positional plagiocephaly. The phenomenon usually happens when a baby lies on his back or on either side, forcing the mattress against the skull and moulding the skull in a flat spot. Positional plagiocephaly does not cause brain damage, but may contribute to lessening of aesthetic appearance of the head.
how to inspect 'flat spots'

The flat spots correct on their own by the time a child is 6 months of age. By that time the baby will be spending less time on his back and more time either crawling or sitting. However, the following measures can be taken to correct plagiocephaly:
  • Change the position of the baby’s head during naptimes. By alternating her head to different sides, the pressure on the singular spot will be dispersed across the head making the flat spot disappear.
  • Increase the baby’s ‘tummy time’, starting from 5 to 10 minutes from the first month, and working up to 30 minutes by the fourth month.
  • If the baby is bottle fed, change the position of the baby to prevent pressure application to the skull on one side only.
  • Decrease the time a baby spends in bouncers or a car seat. To facilitate a baby to learn how to sit, place her in your lap, and support her back by encircling her spine with your front. This way not only will she soon start sitting but there will be no pressure to exacerbate the flat spot. Support sitting however should only be done after 4 months of age.

by making the baby sit in your lap for part of the day, not only will it contribute to flat spots' correction, but also help her explore the world around her


take pictures of the baby's head every week to notice any progress and/or irregularities

For a detailed medical description of plagiocephaly, you can visit the following website of the National Health Services, supported by the United Kingdom:
I personally found the site very helpful as it describes in detail the extent of seriousness of the concern and the associated medical remedies if required. Plus it's validated by medical practitioners!
 

Mama, Baby and Diapers Copyright 2009 All Rights Reserved Baby Blog Designed by Ipietoon | All Image Presented by Online Journal