Showing posts with label DIY. Show all posts

Friday, 3 May 2013

DIY Day: M for Mother, M for Me

0 comments
On mother's day it's not wrong to expect a little something sweet from those mini versions of yourself, or the partner who helped you in bringing them into this world. 
However, at times those presents just fail to meet the hgh expectations you've set for yourself and you end up in a vicious cycle of either blaming the ones who gave you the presents or yourself for being unable to raise them the way you had hoped to.


Instead of a spa voucher you get a spoons set, or in place of a nice breakfast in bed you land in a dirty kitchen.


So instead of letting your expectations blow up in your face, guide your loved ones to indulge n some self-love with you.

Here are a couple of ideas I snitched from the net to add a little glamour to your wardrobe and help us all regain our former sense of style.

Footwear Makeover


The Clutch Crush


Create the easiest DIY no-sew clutch from a place mat and a thrifted belt @ By Wilma

Infinity Scarf for the Casual Look


Simple yet quite effectve DIY ideas that will not only help you spend time wth your loved ones but also add something special to your wardrobe.
Craft away!

Sunday, 21 April 2013

DIY Day: Cereal Craze

1 comments
I began experimenting with dry cereal as a suitable finger food for my baby. However, I ended up eating most of them myself. They've been making them so delicious now! At times I didn't even bother to add milk - grab a handful from the box and just chew away!

oh my! what'll the kids eat now?

What I was then left with was a big pile of empty cereal boxes. So I got thinking of DIY ideas I could use these boxes for.
Here are a couple I came across while browsing through pinterest.

Crayon Sorter


If your child loves colouring but doesn't love to clean up after, here's a quick tutorial on how to make this cool crayon organiser. I doubt the kids will have any excuse not to clean then.

Note Pads

earth day craft

Help the kids recycle leftovers of partially used note books by following this tutorial. It'll be their little precious diary. 

Or opt for these pretty to look at note-books made easy through these instructions 

Puzzles


A new puzzle every time a box empties. No repetition and no boredom! Here's how to make one.

Wallets for the little savers

Food box wallet

A DIY for a little grown up kids to help them understand the idea of measurements as well.

Book Marks


These are so easy to make! And so many at a time!


Friday, 1 March 2013

DIY Day: Clock Face

0 comments
Last summer my niece came over to live with us for a while. She's 5 years old and loves to talk; non-stop.
Now I may sound a little ruthless, but there did come a point when I wished she would just take her conversation elsewhere. I tried many tactics to distract her: I'd ask her to draw, or help me with chores or play with her the game of 'who stays silent the longest'.
None of them worked.
However, one thing that did work was time. Now the reference is not figurative, but rather literal. Whenever I asked her what time it was, she'd be dumbfounded. She was confused between the hands and the markings on the clock and how they seemed to present the order of telling time.
That is when I had thought of making a tool could aid children in learning how to tell time.
This is what I came up with: the DIY clock face.
The Clock Face is an easy-to-make toy that may help children like my niece boast of their intelligent mind.

Clock crew

You will need:


  • Cardboard (for making the base)
  • Patterned or plain paper
  • Scissors
  • Glue
  • Markers and pencil
  • Compass (I used a couple of cylindrical boxes, owing to a baby-proof house that does not stock sharp needles)
  • Thread or ribbon (not shown)

Round and round

Using a compass and scissors, cut out a large round base from the thick cardboard.
Cut out a round strip from the pattern paper that is smaller than the original base, cut out before.
Notice the difference in sizes in the picture below.


12 (x2) hours in a day, 60 minutes in an hour

Paste the round strip on the base, and using different coloured markers, label the hours on the strip inside, and the minutes on the bigger cut-out.


The hands on the clock, go round and round

Use the cardboard to cut out the hands of the clock, one longer than the other. Using a punching machine, make holes at the ends of the hands and pull a threaad through to extend on either end.


Make a hole in the middle of the clock base and pull the thread through the bottom, and tie a knot to secure it in place. Repaet the action to tie a knot in the front.
Cut the excess ribbon/thread.


Hickory Dickory Dock

... and here's the final clock!


The hands are easily movable so you can play with it for hours, prompting your child to tell you what time it is by palcing the hands on different numbers.
And once they've mastered the art of time, introduce them to Marty McFly, the man who plays with time like its his hobby.


Tuesday, 12 February 2013

DIY Day: Owl-themed Valentine's card

2 comments
I believe that children are born intelligent. They have an innate ability to grasp ideas quickly and comprehend hidden meanings and patterns in their surroundings. As parents, it is our responsibility then to hone this ability.

beat that einstein!

A good way to do that is by putting them up to a challenge. This DIY tutorial tries to do exactly that. And since Valentine's is coming up, I thought of coupling the challenge with the occasion.
The owl-themed valentine's card by Annette is a puzzle in itself and once finished is an adorable present.

Step 1: what you need


  • Glue
  • Scissors
  • Coloured or patterned paper (for heart-shaped cut-outs)

Step 2: snip, snip ...

The project involves using only hearts to make a complete body of an owl.
Use the coloured/patterned paper to cut out heart shapes. 


You will need 1 big heart for the body (as shown in the picture above)
2 medium hearts for the head outline (white hearts in the top row)
2 medium hearts about half-inch smaller than the hearts used for the head outline - these will be used for the head (the second row patterned hearts)
2 small hearts for talons (white coloured bottom row) - these will be pasted upside down to give the appearance of toes
1 tiny heart for the beak (to be pasted upside down under the head)

Step 3: the puzzle at hand

With the cut-outs spread out, ask your child to figure out how they might go together. You can show her the picture of the final project which will look like this:


Here's how it is made.
Glue the smaller medium sized heart shapes onto the medium hearts, cut out for the head outline. Paste these onto the big heart cut out for the body. Remember to fan out the two heart shapes used for the head to give it the shape of a head. Place the smaller heart cut out for the beak upside down atop the now formed head and glue it. 
Use the small hearts for talons. You can paste it onto the body either at the front or as toes peeking from behind.
I drew in round eyes with eyelashes to let the other person know that it was from a girl. You can choose to use different shapes or stickers for the eyes.


By the end of the project your child will be left mentally stmulated to try more puzzles of the sort. And with each additional owl she makes you can accompany them with tiny goodie bags to share them with her friends.

Happy Valentine's


Wednesday, 30 January 2013

DIY Day: Valentine's inspired Hair Accessories

5 comments
There is no reason to inhibit yourself from expressing your love to someone. The words have a pure intention of kindness and seek to flatter - no harm in that. And while words communicate one's emotions, a gift allows expression of one's affection in a more obvious way.
This installment of our DIY Day is a little project inspired from one of our previous collections. These adorable Valentine's inspired hair clips look so cute!  A little present for your daughter, or for your daughter to give to her friends.

Step 1: Components


You will need:
  • 3 x 3 inches pieces of fine felt cloth (or any non-woven fabric). Colours of your choice
  • Hair clips
  • Scissors
Optional
  • Threads of contrasting colours 
  • Sewing needle 
  • Glue 
  • Heart-shaped stencil 


Step 2: Cutouts

Draw a heart shape over the felt cloth. You can use a stencil for a neat look, or fold the pieces to draw a slanted semi circle. 
Cut out the shape. 
Using the scissors, make a cut on one side of the heart shaped cloth, as shown in the picture


Step 3: Complete

Slide the hair clip through the cut, and close the pin.


Cover the top part of the pin using either of the following decorating techniques.


  • You can glue on top, a felt cloth of same colour, or use a thread of contrasting colour to sew the piece.
  • Cut out a smaller heart of a different coloured cloth and sew it on top
  • Use a base heart with jagged ends
  • Create a personalized design


An adorable gift for your adorable little girl


Thursday, 3 January 2013

DIY Day: Hair Accessories Organizer

1 comments
I've always had a soft spot for little, pretty things. I remember, when I was 10, I was more fascinated with Barbie's accessories than the doll herself. It'd be hours before I realized how long I'd been scrutinizing the tiny object and fantasizing of owning it myself.


my world is so pink and pretty!

To this day I can't resist the sight of anything too 'girly'; and if I can't have it, I choose to make it!

Like this real easy headband holder that can also store hair accessories. Though I may have outgrown the competence to pull off such cute hair accessories, I recently projected my love for such, on to a friend's 2-year old.
She's an adorable little thing with rock-star hair! And that hair demands some heavy artillery.
So to help out her mother organize the variety of headbands and pins she had, I made her this really simple holder.


Step 1: gather supplies

  • A large sized circular tin container (length depending upon the requirement of your accessories)
  • Glue or tape
  • Material to cover the container (either a cloth, wrapping sheet or duct tape).


Step 2: dress the lady

Layer the container with the material and extend the coverage to the bottom of the container, but not the top.

You can choose to either leave the top open,


 or

cover it with the same material, seperately, so that it can fit back again on the container.


Step 3: stack up!

Start stacking up your little girl's accessories: head pins, scrunchies and bands will go inside the container,


and the headbands will go around the container.


Try making the organizer with your daughter as it's very easy!
Not only will she enjoy the craft, but also take pride in displaying her accessories which would otherwise be hidden away in the drawer. That way she can have her own sweet accessories rack like her Barbie.


Wednesday, 19 December 2012

DIY Day: the 'flab-to-fab' top

0 comments
Pregnancy demands comfort. 
During my third trimester, I felt the most comfortable in the most popular item of clothing: the t-shirt. Oversized and adaptable to a growing tummy, the baggy shirts that proved to my friend then, post-birth, became my enemies. When I look at them now I just see a clutter stealing space in my closet.
Thanks to 'By WIlma', here's what I did to transform the floppy shirts to cute tops!


Step 1: sealing the boundaries

Place the shirt on a flat surface. Using a crayon, mark the shirt with alterations as illustrated in the image below.


Widen the neckline as desired, from the front and the back. Please note that the plunge in the front will be deeper than the back, as shown by the red trace in the above illustration.

Next, make four small cuts, as shown above, for the ribbon to slide through. The width of the cuts should match the width of the ribbon for a perfect fit. 
The first two cuts in the middle will be right below the bosom and a subsequent cut is to be made 4 inches from the first cut, closer to the sides of the t-shirt. 


Step 2: crafting the ribbon

Cut a ribbon in four pieces, each piece having a length of 14 inches. 
Insert the ribbons in each cut, in the direction shown by the arrows below.


Glue the ends of the ribbons (inserted inside the shirt) to the shirt. Now you will have four ribbons, two protruding from either side.
Wait for the glue to dry. To make a stronger bond with the shirt, you can also sew the ribbon under the shirt, either using the same colour thread (as of the shirt) or a colour of contrast for more vibrance!

Step 3: look pretty!

Wear the t-shirt and fasten the ribbons; first the ribbons on the inside and then those further towards the sides of the shirt. 


Voila! De toute beaute!


Wednesday, 12 December 2012

DIY Day: Newborn Keepsakes Shadow Box

3 comments
In the beginning it seems it'll never end!
With the constant crying on both ends (the mother and the baby), the strict scheduling of feeding every two hours, inability to adjust to what's happened to your body, enforced insomnia and of course counting to multiple centuries of diaper changes, time seems it's stood still.
However, once you're past the trauma, one day you sit down and wonder 'did I take a shower today?' :P 
Not really actually. You reminisce the initial months; and just for moments like these, you want to preserve your baby's tiny souvenirs from the early days. 
That is exactly what a newborn keepsakes box is for. Not only does it make for a timeless piece but a great decoration for your nursery.

Here's an easy guide on how you could make one:

Step 1: the shadow-box itself


Unless you already know a stationery shop that sells show boxes in Karachi, it'll be a little tough to find one here. Therefore, I sought out an online tutorial that uses regular frames to make a shadow box.

from this ...


... to this!


You can easily buy a variety of frames of your choice from either Gul Plaza in Saddar, or Nursery on Shahra-e-Faisal, or buy some from  here on OLX.  
You can also choose to make one from cardboard following the tutorial from this blog.

like a tiny doll house

Before you begin, however, decide upon the measurements you'd want for your shadow box display so that it can hold the items you may have assembled earlier.

Step 2: background theme


Select a theme for your display. You can line the box with fabric/wrapping paper/scrap book paper of your choice.


choose vibrant colours


you can use a variety of different papers to create a personalized theme


A wise choice would be to select a timeless paper so your shadow box display doesn't get outdated. Make sure the background doesn't clash with your items.


you can also create a background yourself using different shapes and/or pictures

You can also layer the box lining with styrofoam and felt over it, to allow items or accessories to be pinned onto the board.  

Step 3: the most exciting part!

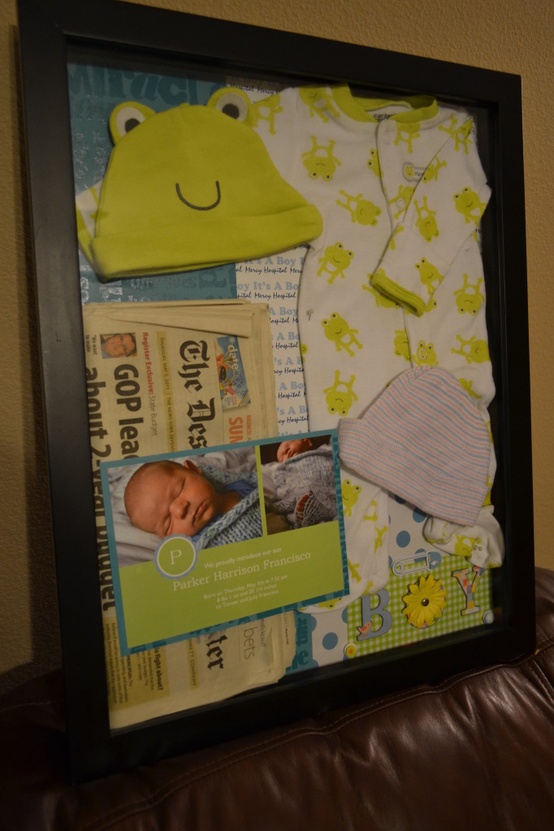
Select the different items you want to display in the keepsakes exhibit. Usually parents cherish the hospital notifications/identity tags (read hospital souvenirs)  to feel nostalgic all over again once their child grows up to become a rebellious teenager.
You can choose to display the clothes from the day the baby came home for the first time; first hat; first pair of shoes; first diaper brand (unused of course); hospital tags; photos of the newborn or the pregnant mother, or better, both; baby announcement; or any other thing you may want to add!


Here are some pictures I discovered on pinterest of the final masterpieces!


do give this a try and let us know how it turned out! 


Mama, Baby and Diapers Copyright 2009 All Rights Reserved Baby Blog Designed by Ipietoon | All Image Presented by Online Journal